網頁

2017年12月22日 星期五

UNIX入門課程1061_ex10

 http://erdos.csie.ncnu.edu.tw/~klim/unix-intro/unix-intro-1061.html

作業10: awk programming, associative array
如下例所示, 計算每個人的總和.
$ cat IN-7
# sample input file of exercise 7
                    # this is an blank line.
1234 Alice          # Alice wins 1234
999  Bob            # Bob wins 999
Alice 200           # Alice spends 200
Bob 100 Alice       # Bob loses 100 to Alice
4000 Bob 250 Carol  # Bod wins 4000 and loses 250 to Carol
3000 Carol 300      # Carol wins 3000 and spends 300

$ ./ex10.awk IN-7 Carol has 2950 Bob has 4649 Alice has 1134
$

解答:

#!/usr/bin/awk -f
BEGIN {
}
{
  sub(/#.*/,"") # change #.*  to ""
  for (i=1; i<=NF; i++) {
    if ($i ~ /^[0-9]/) {   #-----$1 is number
      money=$i
      if (i==2 || i==3) {  #-----money is spends or loses
        name=$(i-1)
        array[name]=array[name]-money
      }
    } else {               #-----$1 is name
      name=$i
      money=$(i-1)
      array[name]=array[name]+money
    }
  } #for END
}
 
END {
  for (name in array)
    printf("%s has %s\n", name, array[name])
}

執行結果:


2017年12月15日 星期五

UNIX入門課程1061_ex9

http://erdos.csie.ncnu.edu.tw/~klim/unix-intro/unix-intro-1061.html
作業九: listing a directory recursively
•建立一個 shell 執行檔, 名為 showdir, 可印出 類似用 tree -F 所得的結果.
若檔案為一目錄, 則在檔名後加 '/'
若檔案為一 symbolic link, 用箭頭顯示. 如上圖所示.
若目錄無法讀取內容, 則略過其以下的內容, 即只顯示目錄名字.
請勿用 find, du 或其他指令先得到一個 tree.


$./showdir /var/tmp/exer9-test-dir
exer9-test-dir/
|---city/
|   |---lapula --> ../sky/temple/utopia
|   `---rome
|---dogs/
`---sky/
    |---birds
    |---mountains
    `---temple/
        |---asking
        `---utopia

$ tree -F /var/tmp/exer9-test-dir
/var/tmp/exer9-test-dir
|-- city/
|   |-- lapula -> ../sky/temple/utopia
|   `-- rome
|-- dogs/
`-- sky/
    |-- birds
    |-- mountains
    `-- temple/
        |-- asking
        `-- utopia
     
4 directories, 6 files
$


解答:
#!/bin/bash
olddir=$PWD
dirdepth=0
function is_last_file {
  local flag
  let flag=${ary[dirdepth]}-1
    if [ $flag -eq 0 ]; then #last file
      ch="\\"  #as \---
    else
      ch="|"   #as |---
    fi
}
function print_file {
  is_last_file #check this file is last?
  case "$1" in
      -D) printf "$ch---$2/\n"
          ;; #file is directory
      -L) printf "$ch---$file --> "
          ls -l $file | awk '{ print $11 }'
          ;; #file is link
      -F) printf "$ch---$file\n" #normal file
          ;; #file is normal file
  esac
  let ary[dirdepth]=ary[dirdepth]-1
}
function check_file_type {
  if [ $dirdepth -gt 0 ]; then  
          for ((i=0; i<=dirdepth-1; i++)); do
            if [ ${ary[i]} -ne 0 ]; then
              printf "|   " #print | & 3 space
            else
              printf "    " #print 4 space
            fi
          done # for END
  fi
  if [ -d "$file" ]; then 
      print_file -D $file #directory  
  else          
      if [ -L $file ]; then
          print_file -L $file #symbolic link
      else 
          print_file -F $file #normal file
      fi
  fi
}
function listfiles {
  cd "$1";
    f_count=`ls -l | wc -l`  #calc total files 
    let f_count=f_count-1
    ary[dirdepth]=$f_count

  if [ $f_count -ne 0 ]; then # if dir is empty then exit
    for file in *; do
      check_file_type $file #call sub
      if [ -d "$file" ]; then
          let dirdepth=$dirdepth+1
          listfiles "$file"
          cd ..;
      fi
    done #for END
  fi
  let dirdepth=$dirdepth-1
}
#-----Main Program 2017/12/06 update-----
#d=$1
#echo "${d##*/}/"
echo "$(basename "$1")/"
listfiles "$1"
 
執行結果:


2017年12月9日 星期六

UNIX入門課程1061_ex8

http://erdos.csie.ncnu.edu.tw/~klim/unix-intro/unix-intro-1061.html

作業八: hanoi tower
•建立一個 shell 執行檔, 名為 hanoi, 可印出 hanoi tower problem 中 disc 移動的順序

$ ./hanoi 2    # move 2 discs, from A to B by C
from A to C
from A to B
from C to B
$ ./hanoi 3    # move 3 discs, from A to B by C
from A to B
from A to C
from B to C
from A to B
from C to A
from C to B
from A to B
$

解答:

#!/bin/bash
function move_disc {
  if [ $1 -ne 0 ]; then
    move_disc $(($1-1)) $2 $4 $3
      echo from $2 "to" $3
    move_disc $(($1-1)) $4 $3 $2
  fi
}
#-----Main Program-----
disc=$1
if [ $disc -gt 0 ]; then
  move_disc $disc A B C
fi

執行結果:


2017年12月2日 星期六

UNIX入門課程1061_ex7

http://erdos.csie.ncnu.edu.tw/~klim/unix-intro/unix-intro-1061.html

作業七: range filter with sh
•建立一個 shell 執行檔, 名為 range, 其使用方法與上題類似, 但參數可能有二個, 可濾出上下限中間的數.
•從 stdin 讀入數字, 一行內的數可能超過一個
$ cat Numbers
6
7
8
9
10
11
12
13
14
129
37
8
119
$ cat Numbers | ./range 10 60
10
11
12
13
14
37
$ cat Numbers | ./range - 60
6
7
8
9
10
11
12
13
14
37
8
$ cat Numbers | ./range 200
$ cat Numbers | ./range 120
129
$ cat Numbers | ./range
6
7
8
9
10
11
12
13
14
129
37
8
119
$

解答:
#!/bin/bash
function Filter_Number() {
  local opt=$1
  local input_num=$2
  case "$opt" in 
    0)echo $input_num
      ;;
    1)if [ $input_num -ge $range_s ];then
        echo $input_num fi
      ;;
    2)if [ $range_s = "-" ]; then
        if [ $num -le $range_e ]; then
          echo $input_num
        fi 
      elif [ $input_num -ge $range_s -a $input_num -le $range_e ];then
        echo $input_num
      fi
      ;;
    esac
}

#-----main program-----
argc=$#
#echo "arg have:$argc"
case "$argc" in
  0);;
  1)range_s=$1
    ;;
  2)range_s=$1 range_e=$2
    ;;
esac
while read data
do
  #set $(echo $data)
  for num in $(echo $data)
    do
      #echo $num
      Filter_Number $argc $num
    done
done

執行結果:


2017年11月25日 星期六

UNIX入門課程1061_ex6

 http://erdos.csie.ncnu.edu.tw/~klim/unix-intro/unix-intro-1061.html

作業六: low pass and high pass filter with sh
•建立二個 shell 執行檔, 名為 less-than, greater-than
•每個執行檔會用到第一個參數當作 bound
•從 stdin 每一行讀一個數字, 滿足條件則印出到 stdout,
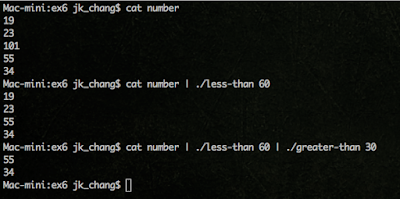
$ cat numbers
19
23
101
55
34
$ cat numbers | ./less-than 60
19
23
55
34
$ cat numbers | ./less-than 60 | ./greater-than 30
55
34
$

解答:
#-----less-then-----
#!/bin/sh
while read number
do
  if [ $1 -gt $number ]; then
    echo $number
  fi
done

#-----greater-then-----
#!/bin/sh
while read number
do
  if [ $number -gt $1 ]; then
    echo $number
  fi
done


執行結果:

2017年10月17日 星期二

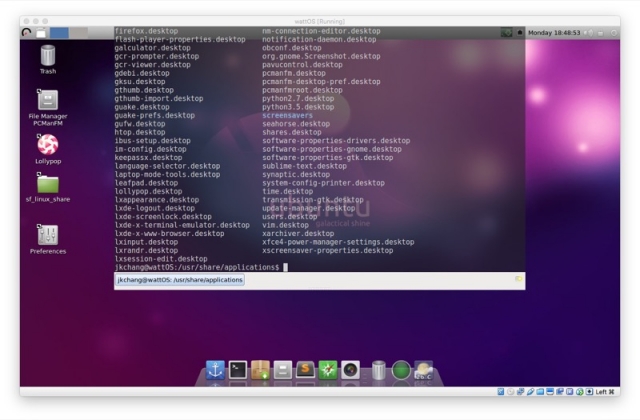
對於使用Linux的人來說終端機(terminal)是不可或缺的工具,今天介紹的 Guake Terminal 和一般的 terminal 最大的不同就是它會定在螢幕的上方,按 F12 就會顯示出來,非常方便。 guake-1.jpg
安裝方式非常簡單: sudo apt-get install guake sudo apt-get update 安裝後如果希望在登入後就啟動常駐,在LXDE桌面系統下可以執行:
sudo ln -s /usr/share/applications/guake.desktop /etc/xdg/autostart/ 

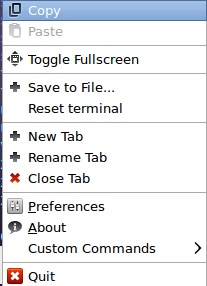
更改設定可以在視窗西岸的情況下按下滑鼠右鍵,選擇 Preferences :
guake-2.jpg

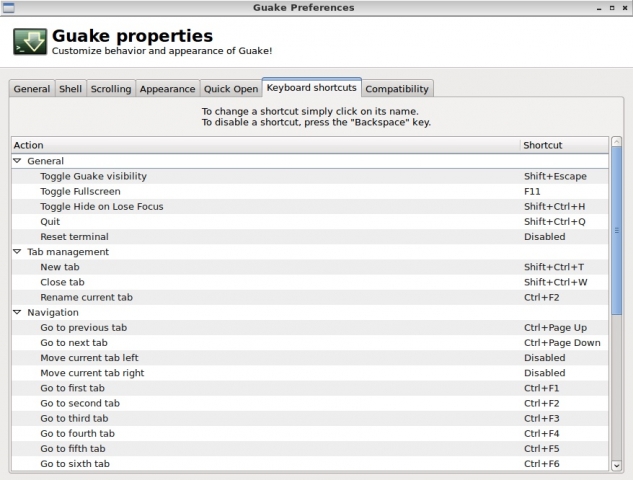
可以修改一些設定或是自訂快捷鍵: guake-3.jpg

2017年10月15日 星期日

Virtual Box 設定分享資料夾 (Ubuntu)

這裡示範在 Mac OSX 中的 VirtualBox 如何設定 Guest OS 為 Ubuntu Linux的分享資料夾。也就是在VirtualBox裡的Ubuntu可以存取MacOSX的資料夾。

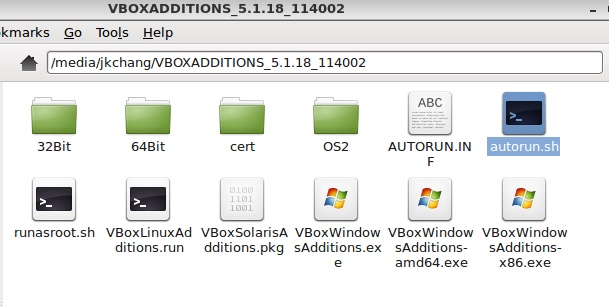
1.首先安裝VBOXADDITION,到VB的 Device 選單選擇Insert Guest Addition CD image ,之後會掛載一個CD Image,打開後執行autorun.sh

vb_share-3.jpg

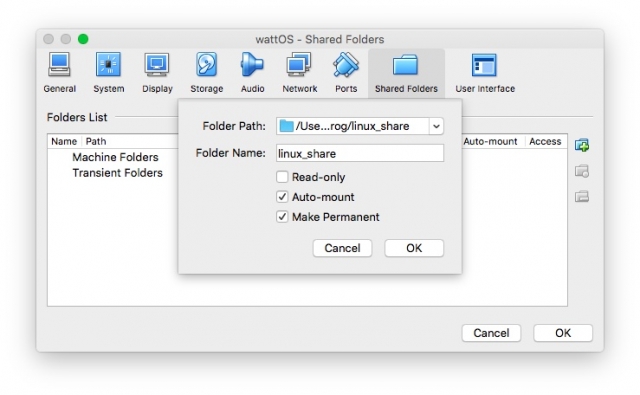
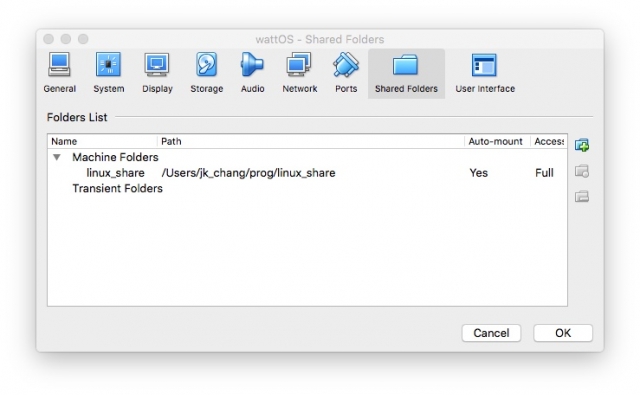
2. 然後設定 Host OS 中要分享給Guest OS的分享資料夾,從「Device」選單中開啟「Shared Folders」設定視窗。點選右方的「Add Shared Folder」圖示。選擇要分享的資料夾路徑與名稱,另外把「Auto-mount」與「Make Permanent」兩個選項也勾起來。vb_share-1.jpg 3. 確認一下路徑是否正確,然後按下「OK」。這樣在 Host OS 中 VirtualBox 這邊的設定就完成了,接下來是 Guest OS (Ubuntu)中的設定。vb_share-2.jpg 4. 在Ubuntu中(在 Guest OS 中)修改 /etc/group,將所有需要用到分享資料夾的帳號加入 vboxsf 群組。首先找尋「vboxsf」這個群組,正常來說應該會像這樣:vboxsf : x : 999 : 然後加上我的帳號名字jkchang,如果要加入多個帳號,就用逗號分隔。

vb_share-4.jpg

或是下指令: sudo usermod -a -G vboxsf username

5. 重新啟動Ubuntu Linux。
6. 開機後,分享的資料夾會掛載在 /media/sf_linux_share,如果想在桌面上建立一個捷徑,可以下指令: ln -s /media/sf_linux_share ~/Desktop

如此桌面上就可以看到OSX分享的資料夾了。vb_share-5_800.jpg

你可以參考: 1. VMware Ubuntu 與 OSX 共享資料夾


2017年3月10日 星期五

SSH 登入免密碼

自從兒子上大學後免不了要連線到學校協助解決一些"課業"上的問題,既然是用連線那就需要用到SSH,但每次SSH登入都需要輸入密碼,對於我這懶人來說是有點麻煩,(這學校密碼錯誤太多次 ip會被鎖住) 所以如何可以快速登入呢? 這裡介紹一個方式就是在Client端產生一組金鑰,然後把把公開金鑰複製到Server的信任名單中,如此一來client端在連線的時候Server端會檢查這組金鑰如果符合自然就不需要密碼了。
要連接SSH的 client端(本機)需要產生一組主機使用的金鑰組。這組金鑰可以在 ~/.ssh 中找到,檔名是 id_rsa (私鑰),id_rsa.pub (公鑰),一般來說公鑰的檔名像是這樣:
~/.ssh/id_rsa.pub
把公鑰複製到server端的信任名單,通常會是這樣:
~/.ssh/authorized_keys

接下來就示範如何操作
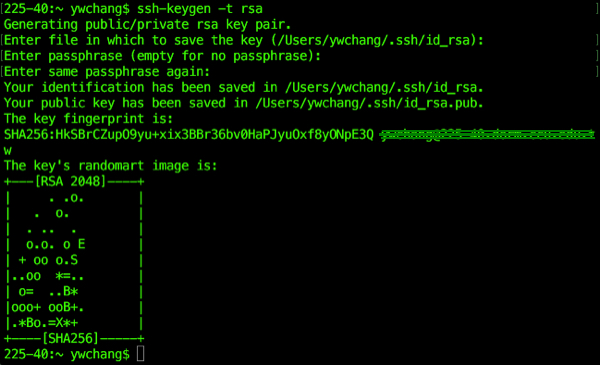
1. 在client端產生金鑰 輸入下面指令 ssh-keygen -t rsa 參數 -t 是指定密碼類型,如果沒有則內定是SSH-2的RSA "Enter passphrase"的地方請直接壓enter,這樣才能不用輸入密碼。 過程中會顯示金鑰的指紋(fingerprint)與 randomartRSA-01.jpg
到~./ssh 目錄下查看,會產生兩個檔案分別是id_rsa 和 id_rsa.pub, id_rsa是私鑰(private key): 這是要保護好的金鑰,它等同於你的密碼,放在自己的電腦中。 id_rsa.pub是公鑰(public key): 這是可以對外公開的金鑰,之後要將它放在遠端的 Linux 伺服器上作認證使用。 RSA-2.jpg

2. 接著把公鑰的內容放在Server的信任清單中 在 client端下以下指令,金鑰就會放進Server的信任清單中了。
cat ~/.ssh/id_rsa.pub | ssh server-user@server-host “cat >> ~/.ssh/authorized_keys"

也可以用 ssh-copy-id 的方式直接將金鑰複製到 server,它預設會將 ~/.ssh/id_rsa.pub 這個公開金鑰複製到伺服器上 ,輸入 ssh-copy-id User@Host
若要指定使用的金鑰,可以使用 -i 參數:
ssh-copy-id -i ~/.ssh/id_rsa.pub User@Host

以上兩個步驟做完後下次登入這台SSH主機就不用輸入密碼囉。

補充一下:
Server端的公鑰原始是有寫入權限的,這樣會蠻不安全的,建議可將authorized_keys設定成唯讀。
RSA-3.jpg